How to Test the Quality of a Background Remover Tool
You will find many background remover tools online, and many of them work… well, sometimes.
It’s tricky when these tools seem okay at first—the previews are clean, edges are sharp, the background? disappears!
But not always.
Many background remover tools can perfectly process a simple photo, but many of them you’ll also find ineffective once you upload a complex image. For example, an image with flyaway hair, a white product against a pale background, or an image with soft shadows.
So what should you do? You test.
This guide is your complete review framework for these background remover tools. You can also get the link to copy and print a checklist to help you with the tests. This is a step-by-step way to check, benchmark, and compare background remover tools so that you can confidently pick the one that fits your business needs.
Why Do You Need a Testing Framework (Not Just a “Try It and See” Approach)?
Without a proper approach to testing tools, you’ll likely make one of these mistakes:
- You only test one image. One image rarely reveals the background remover’s ability.
- You rely on preview quality. Previews are usually low quality; you will not be able to see the actual results if not in HD.
- You judge based on looks, not usability. A tool can be accurate but painfully slow, limited, or hard to scale.
- You don’t document results. Without a scoring system, comparisons become subjective.
A good framework turns “I think this looks better” into “This tool scores higher on edge detail, batch speed, and resolution retention.”
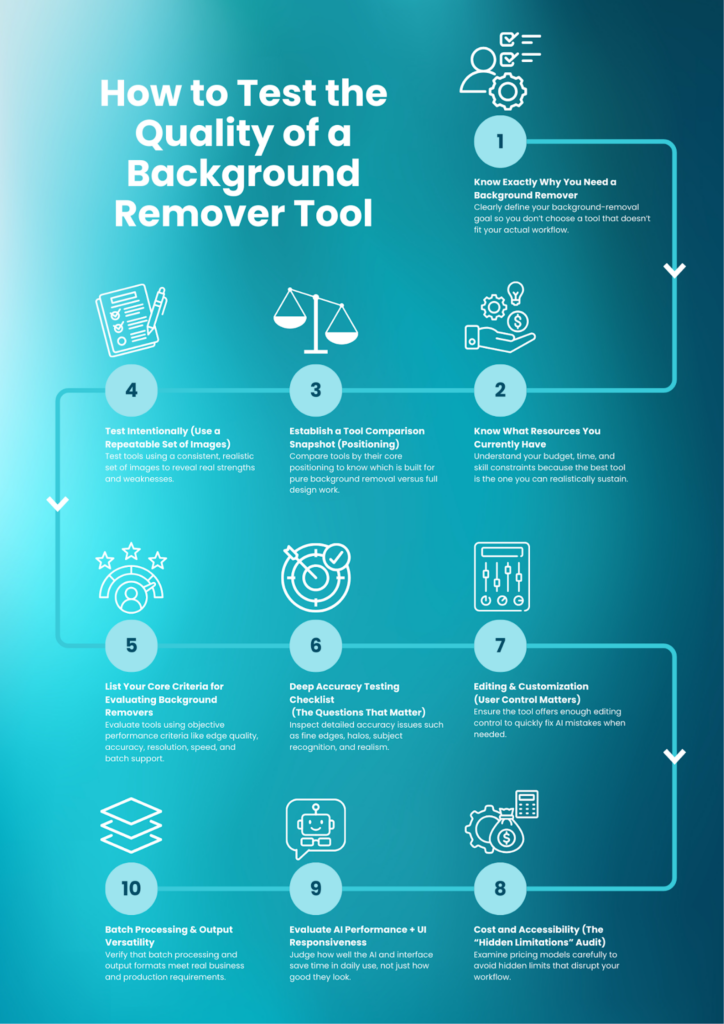
Step 1: Know Exactly Why You Need a Background Remover
Before comparing any tools, you need to be clear about your needs first. This step alone can filter out options that don’t fit.
Ask yourself:
1) Do you need to remove the background of many images?
If you handle product catalogs, marketplace uploads, or regular marketing batches, you need:
- Batch upload
- Batch processing speed
- Bulk download
- Consistent results across a set
A single-image workflow will slow you down fast.
2) Do you want to remove backgrounds and replace them with a new one?
Some tools only output transparent PNGs. Others let you:
- Add a solid background color
- Replace with branded templates
- Drop into design layouts instantly
If your workflow includes creative assets (ads, banners, thumbnails), background replacement matters.
3) Do you only need a transparent PNG?
If your only requirement is a clean, transparent export for a listing or simple design use, your testing can focus more on:
- cutout accuracy
- edge handling
- resolution preservation
- cost per export
4) Do you want to integrate a background remover into your application?
If you’re building or supporting a product workflow, you’ll need:
- API documentation quality
- authentication and rate limits
- speed and uptime reliability
- consistent output formats
- predictable pricing at scale
This is where many consumer tools stop being useful.
5) Is your priority “best cutout quality” or “best all-in-one editor”?
These are not the same.
Some tools are built specifically for background removal and scaling that process. Others are design platforms where background removal is just one feature.
Choosing the wrong category creates friction later.
Step 2: Know What Resources You Currently Have
Background removal is rarely just about the tool. It’s also about your constraints.
1) Budget: Free vs Paid vs Team Plans
Ask:
- Can I pay monthly?
- Do I need seats for a team?
- Will usage grow over time?
- Does pricing scale fairly with volume?
Free tools often have hidden limitations: download caps, watermarks, resolution limits, or batch restrictions.
2) Time: Are you optimizing for speed?
If you’re a solo marketer managing content + SEO + assets, time matters.
A tool that saves 30 seconds per image can save hours per week—especially in e-commerce workflows.
3) Skill level: Do you need advanced editing controls?
Some teams need fine control (restore/erase brushes, edge refinement). Others prefer fully automated results.
Your test should reflect your comfort level and your actual workflow, not an ideal scenario.
Step 3: Establish a Tool Comparison Snapshot (Positioning)
Here’s a quick positioning comparison based on features marketers typically care about:
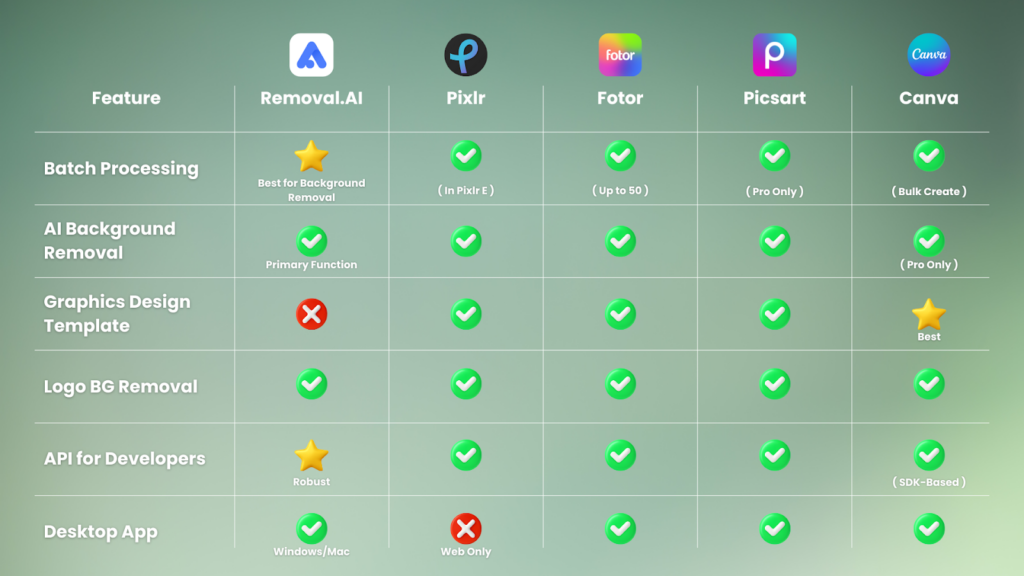
To Summarize:
- Removal.AI is strongest when you need consistent background removal results, batch workflows, and production-ready exports.
- Canva is strongest when you want background removal inside a full design ecosystem.
- Pixlr, Fotor, Picsart sit between editing + background removal and can be good for mixed creative workflows.
But features are not quality. That’s why we test.
Step 4: Test Intentionally (Use a Repeatable Set of Images)
If you want meaningful results, don’t test with random photos. Use a test set.
Build a simple test set of image types
Pick images that reflect real use cases and expose weaknesses:
- Simple product on a clean background
(baseline accuracy) - Product with soft shadow
(shadow preservation) - Hair or fur
(fine edge complexity) - Transparent or reflective object
(glass, bottles, shiny packaging) - White product on light background
(subject separation difficulty) - Multiple objects or group subject
(subject isolation accuracy) - Busy background
(AI detection strength) - Low-light or uneven lighting
(edge clarity under noise)
If you only test with #1, every tool looks good. The truth appears in #3–#8.
We’ve already done this test for you. Read: https://removal.ai/best-background-remover-tools/
Step 5: Core Criteria for Evaluating Background Removers (Score 1–5)
Create a simple scorecard for each tool. Rate each criterion from 1–5.
1) Edge Detection (Detail Precision)
This is the “hair test,” the “fur test,” the “thin strap test,” the “wireframe test.”
Look for:
- jagged cut lines
- missing wisps of hair
- choppy edges on fabric or fur
- over-smoothing that makes it look fake
Score guide:
- 5: natural-looking edges, minimal artifacts
- 3: acceptable but needs manual cleanup
- 1: visibly rough, unusable for professional work
2) Subject Isolation Accuracy (Clean Cutout)
Does the tool:
- cut into the subject?
- leave background remnants?
- remove product parts accidentally?
- struggle when subject and background are similar?
A good tool correctly understands what’s subject and what isn’t.
3) Resolution Preservation (Download Quality)
This is where a preview can mislead.
Check:
- Is the downloaded output lower resolution?
- Does it introduce blur?
- Does it compress edges or soften detail?
- Is the final image suitable for product listings or ads?
If you care about SEO or conversion assets, resolution matters.
4) Speed (Per Image and Per Batch)
Measure time like a real workflow:
- time to upload
- processing time
- time to download
- how the tool performs under multiple images
Some tools are fast for one image but slow in bulk.
5) Batch Processing Capability (Workflow Fit)
Batch processing is more than “can upload multiple files.”
Evaluate:
- bulk drag-and-drop ease
- multi-select download
- naming consistency
- folder outputs (if available)
- whether it times out on large uploads
Step 6: Deep Accuracy Testing Checklist (The Questions That Matter)
Now go deeper. Use these questions when reviewing each image in your test set.
A) Fine Detail Handling
- Does it preserve hair strands, fur edges, or thin objects?
- Does it maintain small holes, gaps, or intricate shapes (e.g., lace, mesh, leaves)?
B) Subject Recognition in Complex Scenes
- Does it correctly identify the main subject in a busy background?
- Does it cut off parts of the subject (hands, product corners, accessories)?
- Does it mistakenly isolate the wrong object?
C) Halo and Color Spill
- Is there leftover background color around the subject?
- Does it create a “glow” outline?
- Does it leave a faint tint from the original background?
Halos look especially bad when placing the cutout on a new background.
D) Multiple Objects and Groups
- Does it isolate all objects correctly?
- Does it merge objects unintentionally?
- Does it miss smaller items in the frame?
E) Shadows and Realism
- Does it preserve soft shadows when needed?
- Does it remove shadows completely (making the subject float)?
- Does it allow control over shadow retention?
For product photos, shadow handling can make or break realism.
F) Background Replacement Fit
- When you place the cutout on a new background, does it look natural?
- Do edges blend, or do they look pasted?
- Is there a difference in lighting temperature that the tool fails to handle?
Step 7: Editing & Customization (User Control Matters)
Even strong AI tools benefit from human refinement. If you care about professional-grade assets, check:
Must-have editing options:
- Restore brush (bring back removed areas)
- Erase brush (remove leftovers)
- Edge refinement / feathering
- Zoom and precision control
Nice-to-have options:
- Soft edge control for hair/fur
- Background color replacement
- Export variations (PNG + JPG + background options)
- Simple cropping and resizing
A tool can score high on AI accuracy but still lose if you can’t fix small mistakes quickly.
Step 8: Cost and Accessibility (The “Hidden Limitations” Audit)
A tool isn’t “best” if the pricing model breaks your workflow.
Test:
- Can you use it for free?
- How many free exports per day/week?
- Is there a watermark?
- Does the free tier restrict resolution?
- Is batch processing behind a paywall?
- Are downloads slower or limited on free plans?
Your framework should include “cost per usable output,” not just “monthly price.”
Step 9: Evaluate AI Performance + UI Responsiveness
This is the part most reviews ignore, but marketers feel it daily.
What to evaluate:
- Is the interface fast and intuitive?
- Does the tool lag when previewing?
- Are controls easy to find?
- Does it make intelligent guesses, or do you constantly fix mistakes?
A tool that saves 10% of your time might be “okay.”
A tool that saves 40% becomes a workflow upgrade.
Step 10: Batch Processing & Output Versatility
If you’re testing for business use, batch output is a serious factor.
Batch workflow tests:
- Can you upload 20–100 images easily?
- Can you download results in bulk without clicking each one?
- Are file names preserved?
- Does it maintain consistent cropping?
Output versatility tests:
- Transparent PNG
- Solid background export
- Original resolution maintained
- Clean edges at full size (not just thumbnail preview)
For e-commerce sellers and photographers, output quality and speed matter more than fancy UI.
Common Pitfalls to Avoid During Testing
1) Testing Only One Image
A single image is a weak test. It’s like judging a camera by one photo taken in perfect lighting.
2) Falling for “Preview Looks Great.”
Always download and inspect at 100% zoom.
3) Ignoring Watermarks and Paywalls
Some tools allow free previews but lock professional export behind Pro.
4) Not Testing With Your Real Workflow
If you always process batches, don’t test with single images only.
If you always replace backgrounds for ads, test that flow too.
Conclusion: Standardize Your Review Process
A high-quality background remover isn’t just the one with a clean cutout. It’s the one that matches your workflow and delivers consistent results at scale.
To standardize your review process, keep your framework simple:
- Build a repeatable set of test images
- Use a 1–5 scorecard for core criteria
- Evaluate accuracy (edges, halos, subject isolation)
- Test batch speed and output formats
- Audit pricing limitations and export quality
- Document findings so the next test is faster
Tools evolve quickly. A reusable framework lets you retest every few months without starting from scratch.
Q&A
What is a high-quality image?
A high-quality image is generally 300 PPI or higher, especially for print. DPI (Dots Per Inch) is also commonly considered high quality at 300 DPI+. For digital work, “high quality” often also means the image is sharp, well-lit, and not heavily compressed.
What is the best background remover tool?
For product images and high-volume workflows, Removal.AI is often considered a top choice because it’s built primarily for background removal, supports batch processing, and offers developer-friendly options like an API—making it practical for both marketers and businesses.
What makes a background remover high-quality?
A high-quality background remover:
- preserves fine details (hair, fur, thin edges)
- avoids halos and leftover artifacts
- maintains resolution and sharpness
- supports scalable workflows (batch + reliable exports)
- offers user control for refinements
How to test the quality of a background remover?
Use a framework:
- test multiple image types (easy + difficult)
- score tools 1–5 across core criteria
- inspect the downloaded output at full size
- evaluate speed, batch processing, and editing controls
What is everyone using for background removal for images?
It depends on the job:
- Product photos + high volume: Removal.AI
- Developer or app integration: tools with strong APIs like Removal.AI
- Quick edits + casual use: Removal.AI , Fotor, Picsart
- Design-first workflows: Canva, Pixlr, Picsart
What do people think about Removal.AI?
Many users like it for its focus on background removal as a primary function, especially for product images and batch workflows. It’s often viewed as a practical tool for getting clean cutouts quickly without needing a full design suite.
Latest